Mon 24 July 2017
Prerequisites
1. Installing Home Brew
Skip this if you're already using it.
/usr/bin/ruby -e "$(curl -fsSL https://raw.githubusercontent.com/Homebrew/install/master/install)"
exactly as per the website
2. Adding shell & binaries from home brew
Install the following items from brew:
brew install python zsh zsh-completions tmux wget grep
brew install vim --with-python --with-ruby --with-perl
brew install macvim --env-std --with-override-system-vim
The brew version of python is more up to date and easier to install more modules in via pip than OSX (which you don't want to mess with).
Now set your path to /usr/local/bin/zsh (assuming this is correct for your bew installed zsh) via
chsh -s /usr/local/bin/zsh
3. Clone Powerlevel9K from GitHub
Installing the theme
git clone https://github.com/bhilburn/powerlevel9k.git ~/.oh-my-zsh/custom/themes/powerlevel9k
Installing a supported font (symbols, etc)
brew tap caskroom/fonts
brew cask install font-hack-nerd-font
Configuring ZSH to use the theme
open the ~/.zshrc file
Now pimp it out
export TERM="xterm-256color"
DEFAULT_USER=<userid>

POWERLEVEL9K_COMMAND_EXECUTION_TIME_THRESHOLD=0
POWERLEVEL9K_COMMAND_EXECUTION_TIME_BACKGROUND='245'
POWERLEVEL9K_COMMAND_EXECUTION_TIME_FOREGROUND='black'
POWERLEVEL9K_MODE='nerdfont-complete'
POWERLEVEL9K_SHORTEN_DIR_LENGTH=2
POWERLEVEL9K_LEFT_PROMPT_ELEMENTS=(os_icon root_indicator context dir vcs)
POWERLEVEL9K_RIGHT_PROMPT_ELEMENTS=(status command_execution_time time)

POWERLEVEL9K_OS_ICON_BACKGROUND="white"
POWERLEVEL9K_OS_ICON_FOREGROUND="blue"
POWERLEVEL9K_DIR_HOME_FOREGROUND="white"
POWERLEVEL9K_DIR_HOME_SUBFOLDER_FOREGROUND="white"
POWERLEVEL9K_DIR_DEFAULT_FOREGROUND="white"

ZSH_THEME="powerlevel9k/powerlevel9k"
Don't forget to set your terminal font to the 'knack nerd font' we installed before. I reommend using iterm2 here (I like the Tango Dark profile/theme). Now open a new session to see the effect
3. Tmux Power-line bar
Clone the powerline
Execute in your shell:
mkdir ~/Projects/.config
cd ~/Projects/.config
git clone https://github.com/erikw/tmux-powerline.git
Configure tmux
edit ~/.tmux.conf
set-option -g status on
set-option -g status-interval 2
set-option -g status-justify "centre"
set-option -g status-left-length 60
set-option -g status-right-length 90
set-option -g status-left "#(~/Projects/.config/tmux-powerline/powerline.sh left)"
set-option -g status-right "#(~/Projects/.config/tmux-powerline/powerline.sh right)"
Fix weather segment
Most likely the yahoo weather won't work out of the box, check as per this issue the last comment here
in ~/Projects/.config/tmux-powerline/segments/weather.sh set:
TMUX_POWERLINE_SEG_WEATHER_GREP_DEFAULT="ggrep"
TMUX_POWERLINE_SEG_WEATHER_LOCATION="<your location here>"
The weather location can be found in yahoo weather's URL as per the comment line.
4. All done
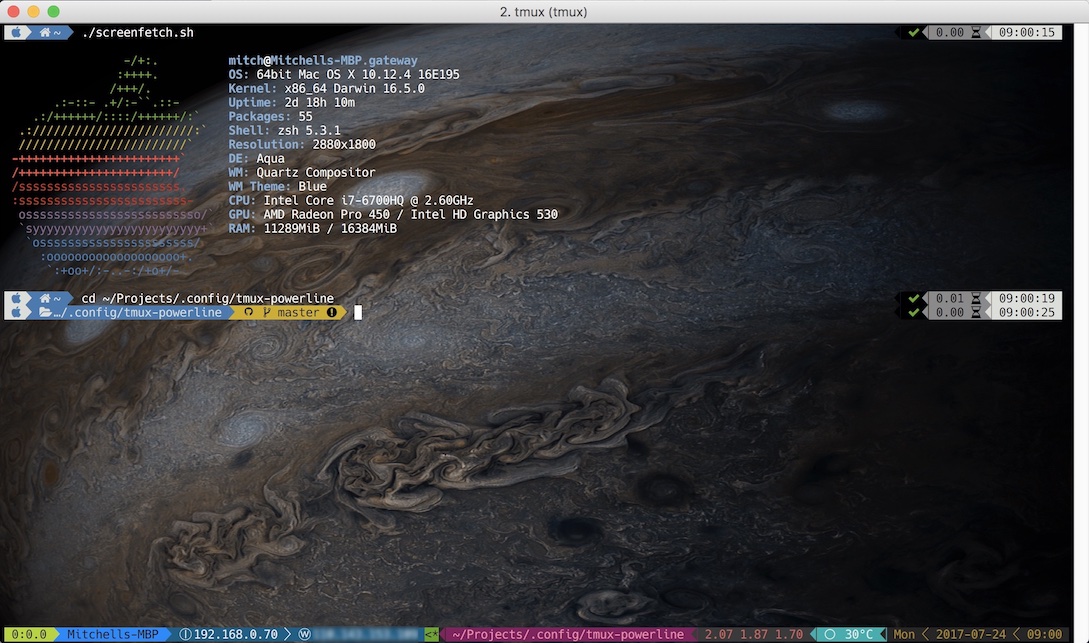
Now you may have something like this, with all the useful information you need and fancy icons.

Automatically open tmux
If you'd like to automatically start tmux with your shell, this basic script inside .zlogin will do the trick.
if command -v tmux>/dev/null; then
  [[ ! $TERM =~ screen ]] && [ -z $TMUX ] && exec tmux
fi
Further reference
This guide will get you started with tmux here.
Lastly, if you are curious for some more stuff you can add to your system to help you get things done, I found a few items I didn't have on this page here.